Identity Verification
Documents
1. Identity document
2. Selfie
3. Confirmation of the place of residence
Additional data
How to contact a verification expert
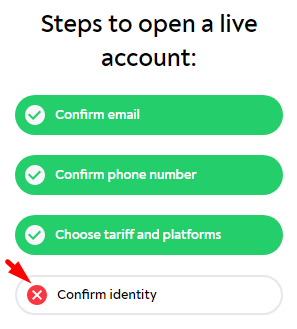
To start verification, tap the “Verify Identity” in your personal account provided that you have already completed all previous steps:
Documents
You will be asked to provide 3 documents in the course of verification. Even though the request forms have the “attach a file” feature, documents are uploaded to the relevant form by default when you tap the “Verify Identity”.
All documents and photos must be in color, with high resolution to ensure detail clarity. The allowed file types are .png, .jpg, .jpeg, and .pdf.
The size of each file must be between 10 KB and 5 MB.
Images cannot be edited using image editing tools and software such as Photoshop, etc.
1. Identity document
The system will suggest specific types of identity documents depending on the country. Typically, these are passports / international passports / ID cards / driver’s licenses.
Since we do not work with US and Canadian citizens, you cannot provide the identity documents issued in these countries.
The edges and corners of the document must remain uncropped.
If this is a book passport, you will have to submit a scan or a photo of the whole first (main) spread, not just one side of it. If this is an old-style paper passport, attach the second spread as a separate file as well.
If your book passport has no indication of the validity period:
– indicate the date when you will turn 45 as the expiration date if you are not 45 years old yet;
– indicate the date when you will turn 100 if you are already 45 years old or older.
In the case of an ID card or a driver’s license, you will have to submit a scan or a photo of each side as separate files.
2. Confirmation of the place of residence
Typically, you can use a utility or internet bill issued in your name, bank statement, government-issued certificates of residency, etc. The verification expert will offer possible options if need be.
Purchase receipts, residence permits indicated in passports, and screenshots shall not be accepted.
This document shall:
– contain your first and last name.
– be issued no more than 90 days before the date of the next account activation.
– confirm the address of residence. The address can be based in any country with the exception of russia, Crimea (occupied region of Ukraine), North Korea, Iran, Syria, Cuba, as well as the USA and Canada.
If you are unable to submit the said document, some clients have successfully tackled this problem here, as far as we know based on reviews.
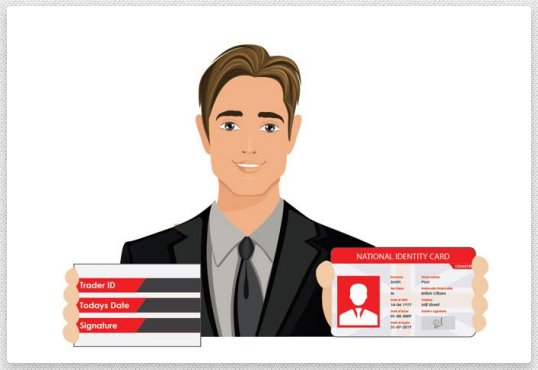
3. Selfie
You need to take a photo with the relevant identity document card while holding a sheet of paper with the following information in large print:
– Trader ID
– Date
– Signature
You can find Trader ID in your personal account on the main page in the upper right corner: TZGERxxxxxx
Please indicate the date in the DD/MM/YYYY format, e.g. 28.01.2023. Do not write the month’s name in words. Selfies, where you hold a sheet of paper with “28 of January 2023” written on it, will not be accepted and you will have to redo it.
The photo must be clear, evenly lit, not overexposed, and without glare. The text shown in the document must be readable.
Here are the examples of what it should look like:

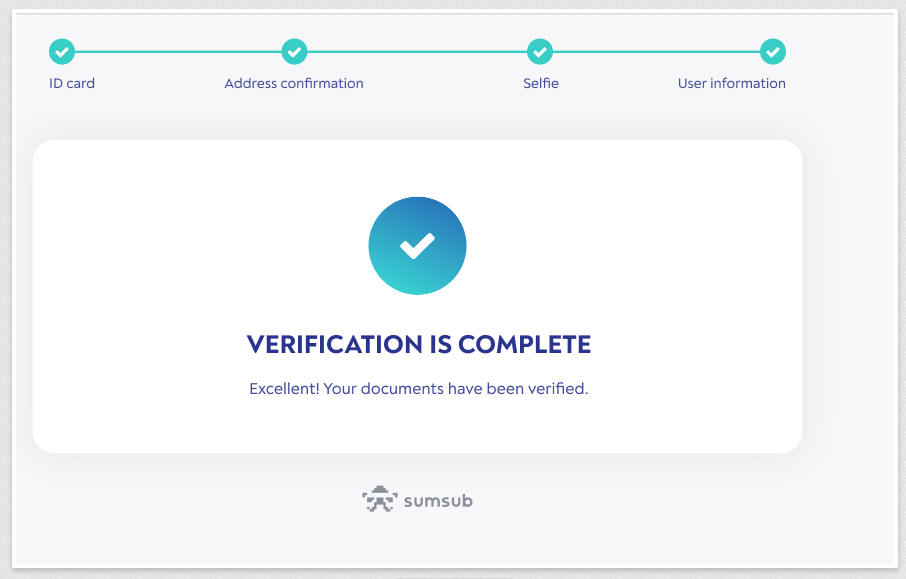
When you get a notification from SumSub that the verification is complete, this does not imply that you have received the “Verified” status just yet. What this means is that the automated system has merely completed the acceptance of documents. Normally, manual processing and verification take a few more days.
Country of tax residency and relevant taxpayer identification number (TIN)
Tax residency and TIN:
Russian TIN shall not be accepted. The same applies to the US ITIN. When this is the case, do not indicate TIN. Instead, choose reason C.

Aside from that, you will need to indicate the place of birth—country, and locality—and confirm that you are not a politically exposed person unless you are one.
Next, you must sign it by entering your first and last name as indicated in your passport / ID card, and hit “Save.”
Verification procedure
The verification process typically takes several days.
If it becomes clear that a certain document does not meet the requirements during verification, the verification manager will return it for further revision. In this case, a window where you can fill out the information and upload documents will pop up when you tap the “Verify Identity” step. A relevant comment will be added to the document that caused a problem. You will also receive an email describing what needs to be fixed.
The emails sometimes end up in the “Spam” or “Promotions” folder if you are using Gmail. So, make sure to check your inbox thoroughly. Should you have any further questions, consider contacting the verification expert.
How to contact the verification expert
You have three options to choose from:
Send a request from your personal account. When creating it, select “Personal Information and Verification” as your Subject:

Example of a request
Even though you can attach a file to your request, it is best that you upload the documents in the relevant form when tapping the “Verify Identity” step.
2. You can drop a message at @verificationGerchikCO via Telegram messenger.
3. You can also send an email at [email protected]
Upon verification
Upon successful verification, you will receive the following email:
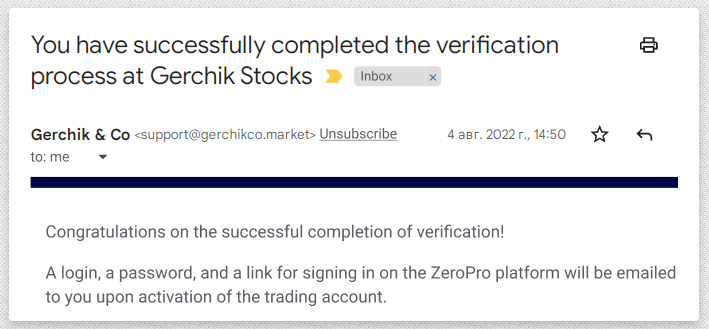
An email confirming the successful completion of the verification
As it has been mentioned earlier, emails sometimes end up in the “Spam” or “Promotions” folder if you are using Gmail. So, be sure to check them out if you cannot find them in your inbox.
In addition, the “Verify Identity” step in your personal account will turn green and will have a checkmark as shown below:

From this point on, you won’t need a verification expert. Should you have any further questions or requests, you can shoot a message to the support desk via Telegram or submit a request with a relevant subject.
If it was your first time getting verified, you will be able to replenish the account after that only. First, you will need to replenish your balance account and then make an internal transfer to the trading account.
You can activate the trading account as soon as its status says “Created.” Typically, the trading account gets this status on the next business day following successful verification. You will also receive this email:
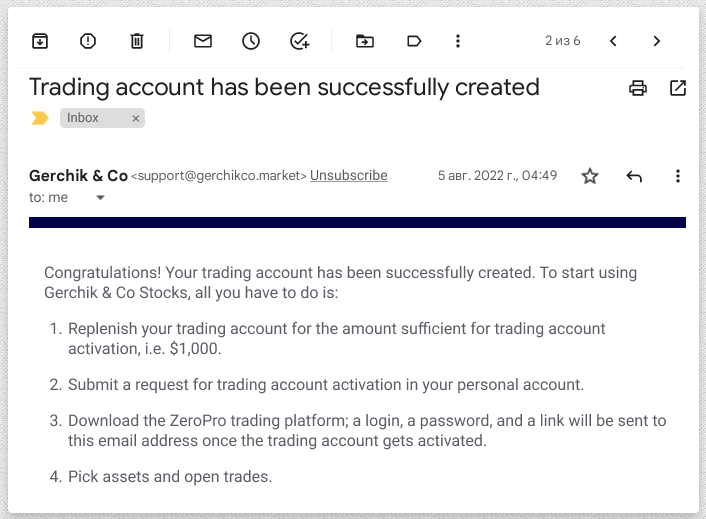
This is an example of an email that comes when the customer chooses the Standard Tariff. If you opted for a different tariff, e.g. Active, the amount stated in the email will be $3,000. If you wish, you can always change the tariff.
If two business days have passed following the successful completion of verification yet the account status still does not say “Created” (you have not received the email and cannot press the “Activation” button), contact our support desk via Telegram or create a request by choosing “Other” as its subject to have that issue resolved faster.
If your account status says “Created” and all steps, except for the last one, have been marked as completed, you can activate the trading account:

When you tap on this step, you will be offered to activate the account right away or postpone it until the beginning of the next calendar month:
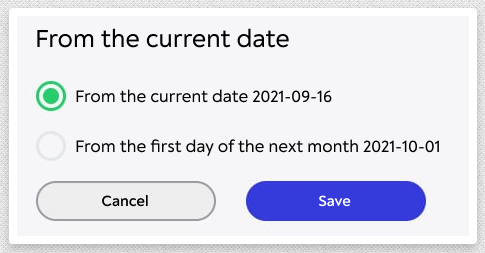
This option has been made available to you since the subscription fee is charged for a calendar month. If you activate your account right away, the subscription fee will be charged for the current calendar month in full, even if these are the last days of the month. So, you can decide for yourself.